
Can I Just Replace My Toyota’s Side Mirror Glass?
If your Toyota’s side mirror glass is busted, there may be no need to pay for an entire side mirror assembly. In most cases, you can put your side mirror back in working order just by replacing the glass.
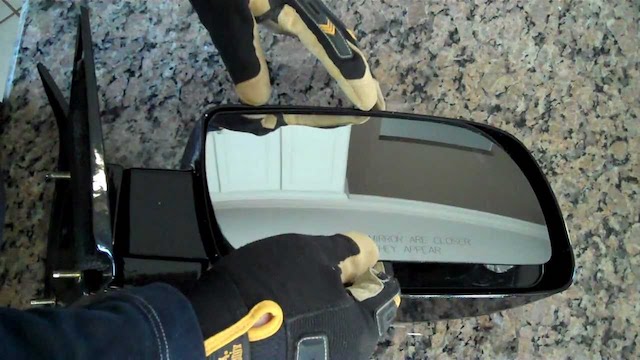
Image credit: AutoandTruckMirrors
The Benefits Of Replacing Only The Glass
Replacing just the glass is:
- Quicker: You have to set aside 1-3 hours to replace the entire assembly. This is quite a long time compared to only 20 minutes to replace the glass.
- Easier: When you replace the entire assembly, you usually have to remove the panel inside the door to disconnect the mirror. When you replace just the glass, you don’t even have to go inside your car.
- Cheaper: Replacing only the glass is typically cheaper than replacing the entire assembly. For example, the side mirror glass for a 2017 4Runner is about $175 cheaper than a side mirror assembly for the same car.
If we were you, we’d be sold on the idea of replacing just the glass. But, you still have to do your due diligence. That means making sure your side mirror assembly is still in working order.
Checking Your Side Mirror Assembly
This is pretty easy to do:
- Inspect the side mirror for damage. Look for cracks in the housing, and don’t forget to check the underside. Take a close look at the area around the pivot for cracks.
- Gently rock the mirror housing in all directions to make sure it’s not loose. If it feels loose, then maybe it just needs to be re-tightened (if the power mirrors still work).
- If you have power mirrors: slide into the driver’s seat and move the mirror fully left to right and up and down. If the mirror doesn’t respond appropriately, look for mechanical damage or wiring issues. You will probably need to remove the broken mirror glass to do this. You may be able to tilt the mirror enough to see behind it.
If you determine that the glass is the only broken part, then replacing it should do the trick.
Note: If you find that your side mirror assembly isn’t working quite as it should, then a full replacement is necessary. The good news is that you can do it at home with this handy tutorial.
Replacing Your Side Mirror Glass

Image credit: Family Handyman
This step-by-step tutorial is based on the Toyota Camry. The steps are generally the same for most Toyota vehicles. If you would like more specifics for your vehicle, YouTube is a great place to look.
Removing The Broken Mirror Glass
- Order an OEM replacement side mirror glass from a reputable authorized online seller like us.
- Grab some masking or duct tape and cover the broken glass with it. This will protect your hands and prevent a mess in case the mirror shatters during the removal process.
- Tilt the mirror all the way down. Locate the two hooks behind it. Use a pick to unhook them from the tabs.
- Pop the mirror out of the housing.
Preparing The New Mirror Glass
Pro Tip: It is much easier to install the new glass in the plastic housing if the housing is warm. The housing should be at least at room temperature. The job will be even easier if you can warm up the housing with a hairdryer. It will soften and get more flexible.
- Put on thick protective gloves.
- Peel off the masking or duct tape from the broken mirror. Then remove all the old shards of glass from the mirror until the plastic housing is empty.
- You may need to use a razor blade to scrape off any remaining adhesive mounting tape.
- Wipe down the back of the new mirror glass and the plastic housing with a plastic-friendly cleaner. Rubbing alcohol works well.
- Grab the double-sided tape supplied with your new mirror glass. Place the pieces on the plastic housing as far apart from each other as possible.
- Put the new mirror glass over the tape and snap it down into the housing. Start with the most angled corner of the mirror. Then do the next most angled corner. You want to finish with the most gently curved edge of the mirror.
Installing The New Mirror Glass
- Check the back of the plastic housing and ensure that all the mounting pins are in their slots. Make sure that they will line up with their receptacles in the mirror assembly.
- Gently pop the new glass into the mirror assembly. Everything will latch into place.
- Test the new mirror with the power controls to see if it’s installed properly.